The Complete Guide to Building Your Personal Brand
Building a personal brand is like building your dream home. Before you can enjoy living in it, you need a strong foundation. Once the foundation is set, you can begin to build and decorate. And when your space feels like your own, it’s natural to invite people in—to share meals, gather, and celebrate in the place you’ve created.
The same is true of personal branding. You must lay the foundation and be intentional about how you present yourself and what you want to say. A personal brand is not a mask or armor to hide behind. It is the opposite. It is revealing who you are. It is letting yourself be seen. To express who you are, you first have to know yourself. That is the journey of building a personal brand.
In this article, we’ll cover the steps to help you start.
Step 1: Uncover Your Personal Brand Story

Storytelling is a skill that everyone can learn if they’re willing to dig deep and be vulnerable. It’s a tool that can help us become better communicators, leaders, and creators. Stories also serve as a medium through which we convey the truth about who we are. A well-crafted Personal Brand Story can bridge the gap between you and the people you want to reach.
How to Choose Your Story
Even if you don't think you have anything to share, that's simply not true. There's always something.
The purpose of your Personal Brand Story is not to recount your entire life story; rather, it is to share a story that relates to the reason behind creating your personal brand.
When selecting a story, consider your "why." Why do you want to build your personal brand? You can highlight a significant transformative moment that demonstrates an important lesson learned. To share a compelling story, focus on the internal shift that occurred within you, rather than the external events that happened to you. It is the inner struggle that captivates us, not the outer one.
Story Starters
Describe a challenging moment in your life and how you overcame it. Explain how this experience connects to your motivation for building your brand.
Share a personal transformation that you went through. Explain how this transformation connects to the reason why you started your business.
Discuss a setback you experienced at work. Explain how you overcame this obstacle and how this relates to the message you want to share online.
How to Write Your Story
Every great Personal Brand Story has three distinctive structural elements that must be clarified both in written and spoken form. This framework is intended to show you the order in which to reveal the parts of your story so you may have a more significant impact on your audience.
The Beginning
Draw us in, set the scene, and make us care about what happens next. Clarify what you believed about yourself (that wasn’t actually true) and how you acted this belief out through your actions.
The Pivot
Show us the obstacle and tell us what decision you had to make. What happened that made you realize your “False Belief”? What was the climax or turning point in your journey? Articulate clearly what is emotionally at stake for you and don’t be afraid to highlight your errors or weaknesses.
The End
Show us how you were transformed while sparking an insight for your audience. How did you triumph and how were you able to cross the finish line? In what ways are you different today because of what happened? How does your story relate to your “why” for building your Personal Brand?
How to Share Your Story
The first place to share your story is on the ‘About’ page of your personal website. If you don’t have a personal website yet, don’t worry, we will cover that in a later section. This is the main place your story should live. Your Personal Brand Story is your “orgin” story and can always be shared at the beginning of any keynote presentation or workshop. In the context of social media, it should be shared in both written and spoken form. For example, you can create a video like this, or place your story in a caption like this.
Step 2: Discover Your Core Values

What are values?
You may have heard the word, ‘values’ thrown around quite frequently, but have you ever paused to consider what yours might be? Have you ever wondered what living a value-driven life actually looks like? Values guide your behavior and drive your decision making. To put it simply, values represent what is most important to you.
Why is it important to know your values?
Values point you in the direction of who you are at your best. Knowing and adhering to your values gives you more clarity, direction, and positive experiences; in turn, this will lead you to making better decisions and achieving greater fulfillment. As you build your personal brand, your clients, customers, and followers are counting on you to show them the way — to lead by example. Before you can lead others, you must first lead yourself. Determining your core values is the first step.
Discover Your Core Values
Let’s determine the values which are most important to you. Answer the following questions:
Can you remember a season in your life where you felt energized, fulfilled and aligned with your true self? What values were you upholding during this season
Consider a time when you were angry, frustrated, or outraged – what was going on? Which values were being compromised during that time?
Think of one person in your life who you look up to and admire. What values does this person possess?
You can use this list of core values to help answer the questions above.
After you’ve discovered your core values, narrow your list down to three. The less values you choose, the more likely you are to integrate them into your life. If you were to live in alignment with these values, would you be operating at your highest self?
Step 3: Write the Copy for Your Personal Website

Anyone who is building their personal brand should have a personal website. The copy on your website is like meeting someone in real life for the first time. Think about the last time you met someone interesting. What did they tell you about themselves? Their name, occupation, or future goals? Your website serves as an introduction between you and the digital world. It's the first impression you'll give to your audience, and your chance to make a lasting impact.
To get started, ask yourself: What are the three most important things I would like to achieve by having a personal website?
Potential Goals for Your Personal Website:
Display your live portfolio
Sell your products or services
Build your email list
Gain speaking opportunities
Gain media and press opportunities
Pages of a Personal Website
Here are the main pages one might find on their personal website. Decide which pages you would like to include ahead of time, then start writing the copy for each page in a word document.
The Home Page is a crucial page as it serves as the main entrance to your website. This is where visitors get their first impression of who you are and what kind of content they can expect to find.
The About Page is where you’ll share your Personal Brand Story and any other personal details like your Enneagram type of Values. This page helps visitors get to know the person behind the website and establishes a sense of trust and connection.
The Blog Page is a place where you’ll share your thoughts, opinions, and experiences related to your niche. Creating a blog allows you to express yourself and connect with your audience. Apart from this, blogs are also excellent for improving your website's SEO. By creating high-quality content that is relevant to your audience, you can boost your search engine rankings and attract more traffic to your site.
The Contact Page provides viewers with the necessary information to get in touch with you. Typically, this page includes a contact form, email address, phone number, and links to social media.
The Sales Page is an optional page that can be included in a personal website if you want to sell products or services. Ideally, you will create one sales page per offering. This page should contain the service benefits, pricing details, as well as a call-to-action to encourage visitors to make a purchase, inquire directly, or join the waitlist.
All of these pages work together to create a complete and well-rounded personal website that can serve various purposes, such as introducing yourself online, showcasing your skills or expertise, or selling products or services.
Effective Copywriting Principles
As you write the copy for your personal website, here are some principles to consider that will make you a more effective writer and communicator. I write with these principles in mind and they have never failed me.
PRINCIPLE #1: Write to the younger version of you.
Think about what you would have wanted to know, what you would have wanted to hear, and what you would have wanted to feel. By doing this, you can create a deeper connection with yourself and your readers, and ultimately, create a more meaningful piece of writing.
PRINCIPLE #2: Write as you speak.
It means writing the way you speak in everyday conversations. Seriously. Can you hear my voice as you read this? Can you feel my assertiveness through the page? I hope so. That's what it means to write as you speak. To achieve this, you need to forget the rules you were taught about writing in the past and let go of your inhibitions. Sometimes, it can be helpful to say what you want to write out loud before putting it down on paper.
PRINCIPLE #3 Remove the pressure.
Thoughts become words. The best way to spill words onto the page is by removing the pressure you feel to write them perfectly. One of the best ways to do this is by writing without any expectations on what the outcome will be. Everyone has thoughts, right? Your job is simply to transfer your thoughts onto the page. Think of yourself as the messenger; you are the medium, the go-between, the delivery driver whose job it is to safely deliver the package to its destination. Do this freely, and allow yourself to write what you feel as you are prompted later in the lesson.
Step 4: Create Your Visual Identity
A visual identity refers to a selection of colors, graphics, imagery, and typography that represent your personal brand. Its purpose is to evoke a certain feeling in your audience and communicate your identity as a person and professional. Your visual identity is a tangible and cohesive outward expression of your inward reality; a reflection of your authentic self. A strong visual identity ensures your personal brand is professional and intentional.
Find Your Inspiration
Using Pinterest is an excellent way to find images that inspire you. As you pin images that match the your desired aesthetic, annotate each image to explain why you have chosen it. Take your time and try not to rush through this step. Aim to include a variety of images based on lifestyle, colors, and typography.
Create Your Mood Board
A Mood Board is a collection of images, colors, and textures that represent the overall vibe or mood you want to convey. In Personal Brand Accelerator, we give our students access to a customizable template that helps them create their mood board. But you can also create this on your own in Canva.

What to Include

Mood Words
Mood words are adjectives that describe your visual identity and personal brand. They serve as a point of reference when choosing your unique color palette, typography, and other design elements.

Color Palette
Your color palette has the ability to elicit an emotional response in your Ideal Brand Adopter. Color theory best practices suggest that it's most beneficial to include a balance of primary, secondary, and accent colors, as well as a neutral option, to bring balance into our work.

Typography
Typography not only reveals your brand's personality, but like colors, can also elicit specific emotions in your ideal brand adopters. By pairing different typefaces together, we can change the energy that your visual identity exudes.
Remember to ask yourself, "Do my design choices match up with my mood words?" Whenever you are stuck, unsure, or lost, refer back to your mood words to stay aligned with your visual identity. You've got this!
Step 5: Plan Your Personal Brand Photoshoot

Great photos are what take your brand from good to memorable. They are the reason someone chooses to go with you versus someone else. They set you apart from the crowd and ensure your personal brand is professional, cohesive, and unforgettable. In this section, we will walk you through the process of planning and executing a photoshoot for your personal brand, ensuring that you capture the essence of who you are and what you do.
Visualize your shoot: Set the Scene
Imagine yourself residing in three unique settings that truly represent who you are and what you do. Consider locations where you frequently spend time, rather than vacation spots or hard-to-reach places. Reflect on your tagline, mission, and vision statements. Think about the transformation you have undergone and the obstacles you have overcome. Can you come up with a setting for your photoshoot that supports this message? Brainstorm different ideas for your photoshoot, including the style, location, outfits, and mood you want to convey.
Find your photographer: explore your options
We recommend collaborating with a Personal Brand Photographer to complete this process. However, hiring a professional can be costly. If you require more time to plan and budget for this expense, you can alternatively work with a friend or family member to capture beautiful photos using your iPhone or camera. To find a personal brand photographer, search location-specific hashtags on Instagram and TikTok or use Google to search for terms like "Personal Brand Photographer" in your city. Select your top three favorite photographers, inquire about their packages and services, and choose the one that best suits your needs and budget.
The price range can vary from $500 to $3,000, depending on your location and the number of photos you require.
Pick a location: ensure it’s both indoors and outdoors
Think about where you envision your photoshoot taking place. Choose a location where you feel natural and comfortable, considering the objectives you have for your personal website. If your home or office space doesn't feel ideal for a professional shoot, consider using platforms like Peerspace to discover new, creative spaces. Consult with your Personal Brand Photographer to ensure options for indoor and outdoor shooting are available. Narrow down your choices to two or three potential locations and confirm the final location(s) with your photographer.
Plan your outfits: don’t procrastinate
Allocate more time than you anticipate for assembling at least three outfits for your photoshoot. Choose both formal and casual outfits that make you feel comfortable and confident. Opt for clothing that complements your desired mood and color palette. Consider investing in tailored items that fit your body well. Prepare your outfits at least one week before the photoshoot and confirm the details with your Personal Brand Coach or Personal Brand Photographer.
Create your prop list: what’s in your starter pack?
Props can add personality and vibrancy to your photoshoot. Include items that you frequently use in your daily life, such as a cherished journal, favorite candle, or meaningful objects. Create a prop list using your favorite items that align with your personal brand.
Confirm your shot list: verify with your photographer
Review your copy deck and consider the shots needed for each section of your website. Discuss your ideas and collaborate with your photographer to ensure that the shots align with your vision and goals for the website.
Prepare the night before: what to remember
Prioritize a good night's sleep before your photoshoot. Press and iron your outfits the night before and pack your things, so you can focus on getting ready the morning of your photoshoot. Create a photoshoot checklist including outfits, props, and essential items.
During Your Photoshoot
Relax and Trust Your Photographer
Play Your Favorite Music and Have Fun
Take Regular Mini Breaks to Refuel and Recharge
Embrace Imperfection and Explore
While you've meticulously planned your photoshoot, it's important to embrace the unexpected and allow room for spontaneity. View any deviations from your original plan as an opportunity to tap into your creative instincts and discover new possibilities. By embracing imperfection, you open yourself up to exciting and unforeseen outcomes that could surpass your initial vision.
Remember, the photos you capture during your photoshoot will make your personal brand memorable and increase the likelihood of achieving your goals.
Step 6: Build Your Personal Website
Many of our students find the process of creating a personal website to be an amazing period of growth and self-reflection. With the help of PBA, this can be a great way to learn more about yourself, what you’re capable of achieving, and solidify how you want to express yourself to the world.
A personal website serves as your central hub on the internet. It’s important to remember that none of us own our social media profiles. If Instagram shuts down tomorrow, your Instagram profile vanishes with it. However, with a personal website, you can be certain that your portfolio of work and self-expression lives on forever. Your website is the only corner of the internet that will ever be uniquely yours, a place where you have unlimited creative freedom to let your unique attributes shine.
Definitions to Know
Website Hosting: Squarespace, ShowIt, or Wordpress are all examples of popular website hosting platforms that offer user-friendly interfaces and customizable templates to create and manage websites. When you host a website, you essentially rent server space to store your site and it’s contents.
Domain: A domain is the unique address of a website on the internet. A domain is composed of two main parts: the domain name (e.g., google) and the domain extension (e.g., .com). Choosing a memorable and relevant domain name is important for creating a strong online presence. We recommend using your first and last name for your domain.
Search Engine Optimization: Search Engine Optimization (SEO) is the practice of optimizing a website to improve its visibility and ranking in search engine results pages. The main goal of SEO is to attract more organic (non-paid) traffic to a website and increase its online visibility.
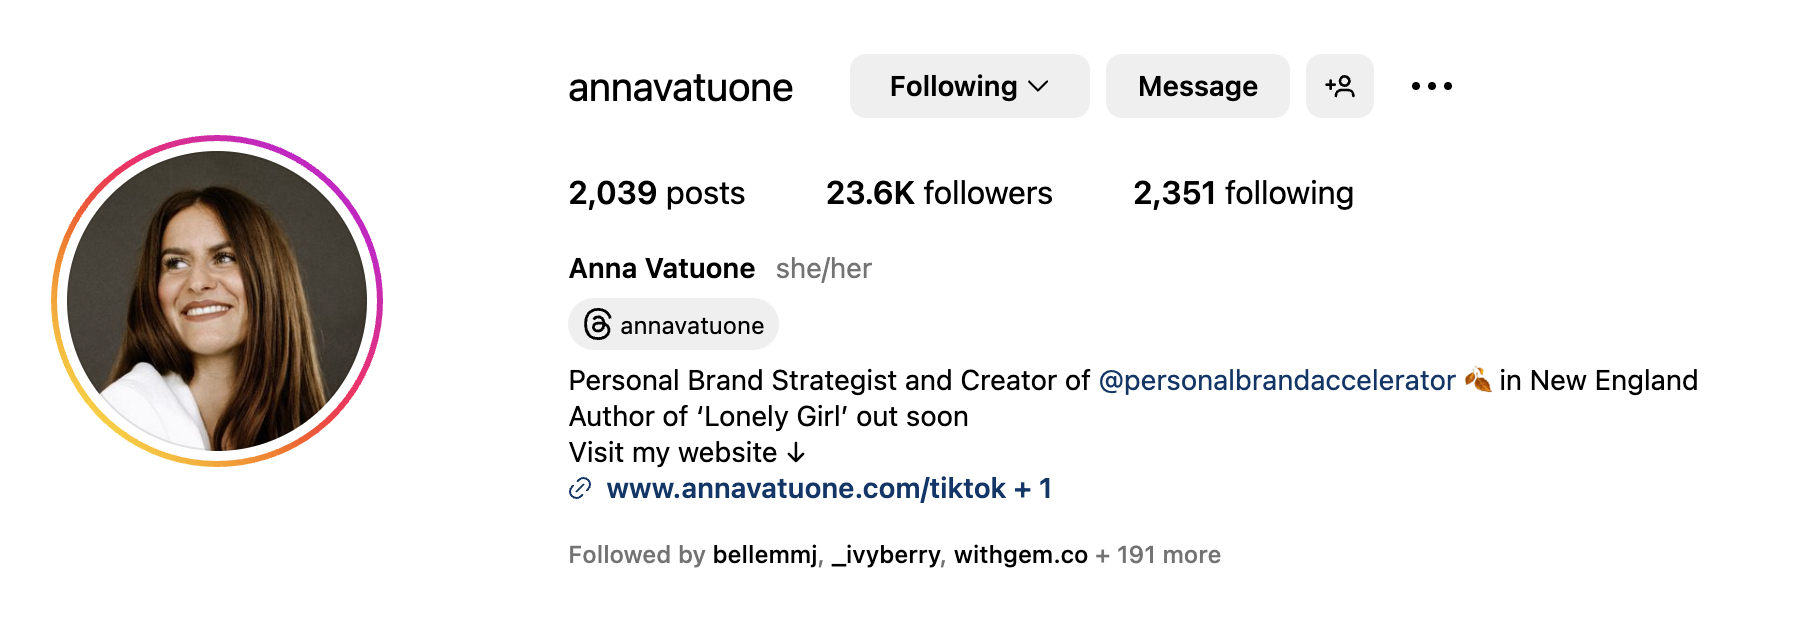
Your Professional Email: Having a personalized email address with your domain name can help create a more professional image and enhance your online presence. Your email address would be different from annvatuone@gmail.com. In this case, your email would be anna@annavatuone.com. The reason for this is because you are using your own domain name, annavatuone.com, to host your email.
Landing Page: A landing page is a web page designed to capture visitors' attention and encourage them to take a specific action. It is commonly used in marketing campaigns to drive conversions and achieve business goals, such as generating leads or promoting a product. A well-designed landing page has a clear call-to-action and delivers a compelling message to the target audience.
Choose Your Platform
Choosing the right website platform for your personal brand can be confusing. With so many different options available, it can be hard to know the right one to select. In the chart below, compare the most popular platforms and help you identify the best choice for you.

(We recommend using Squarespace).
Build Your Website Structure
In this section, you will learn how to create the main pages of your website, structure the navigation, customize the template, and add your content.
Once the skeleton of your website is in place, you can then input your content and make adjustments to the typography and colors.
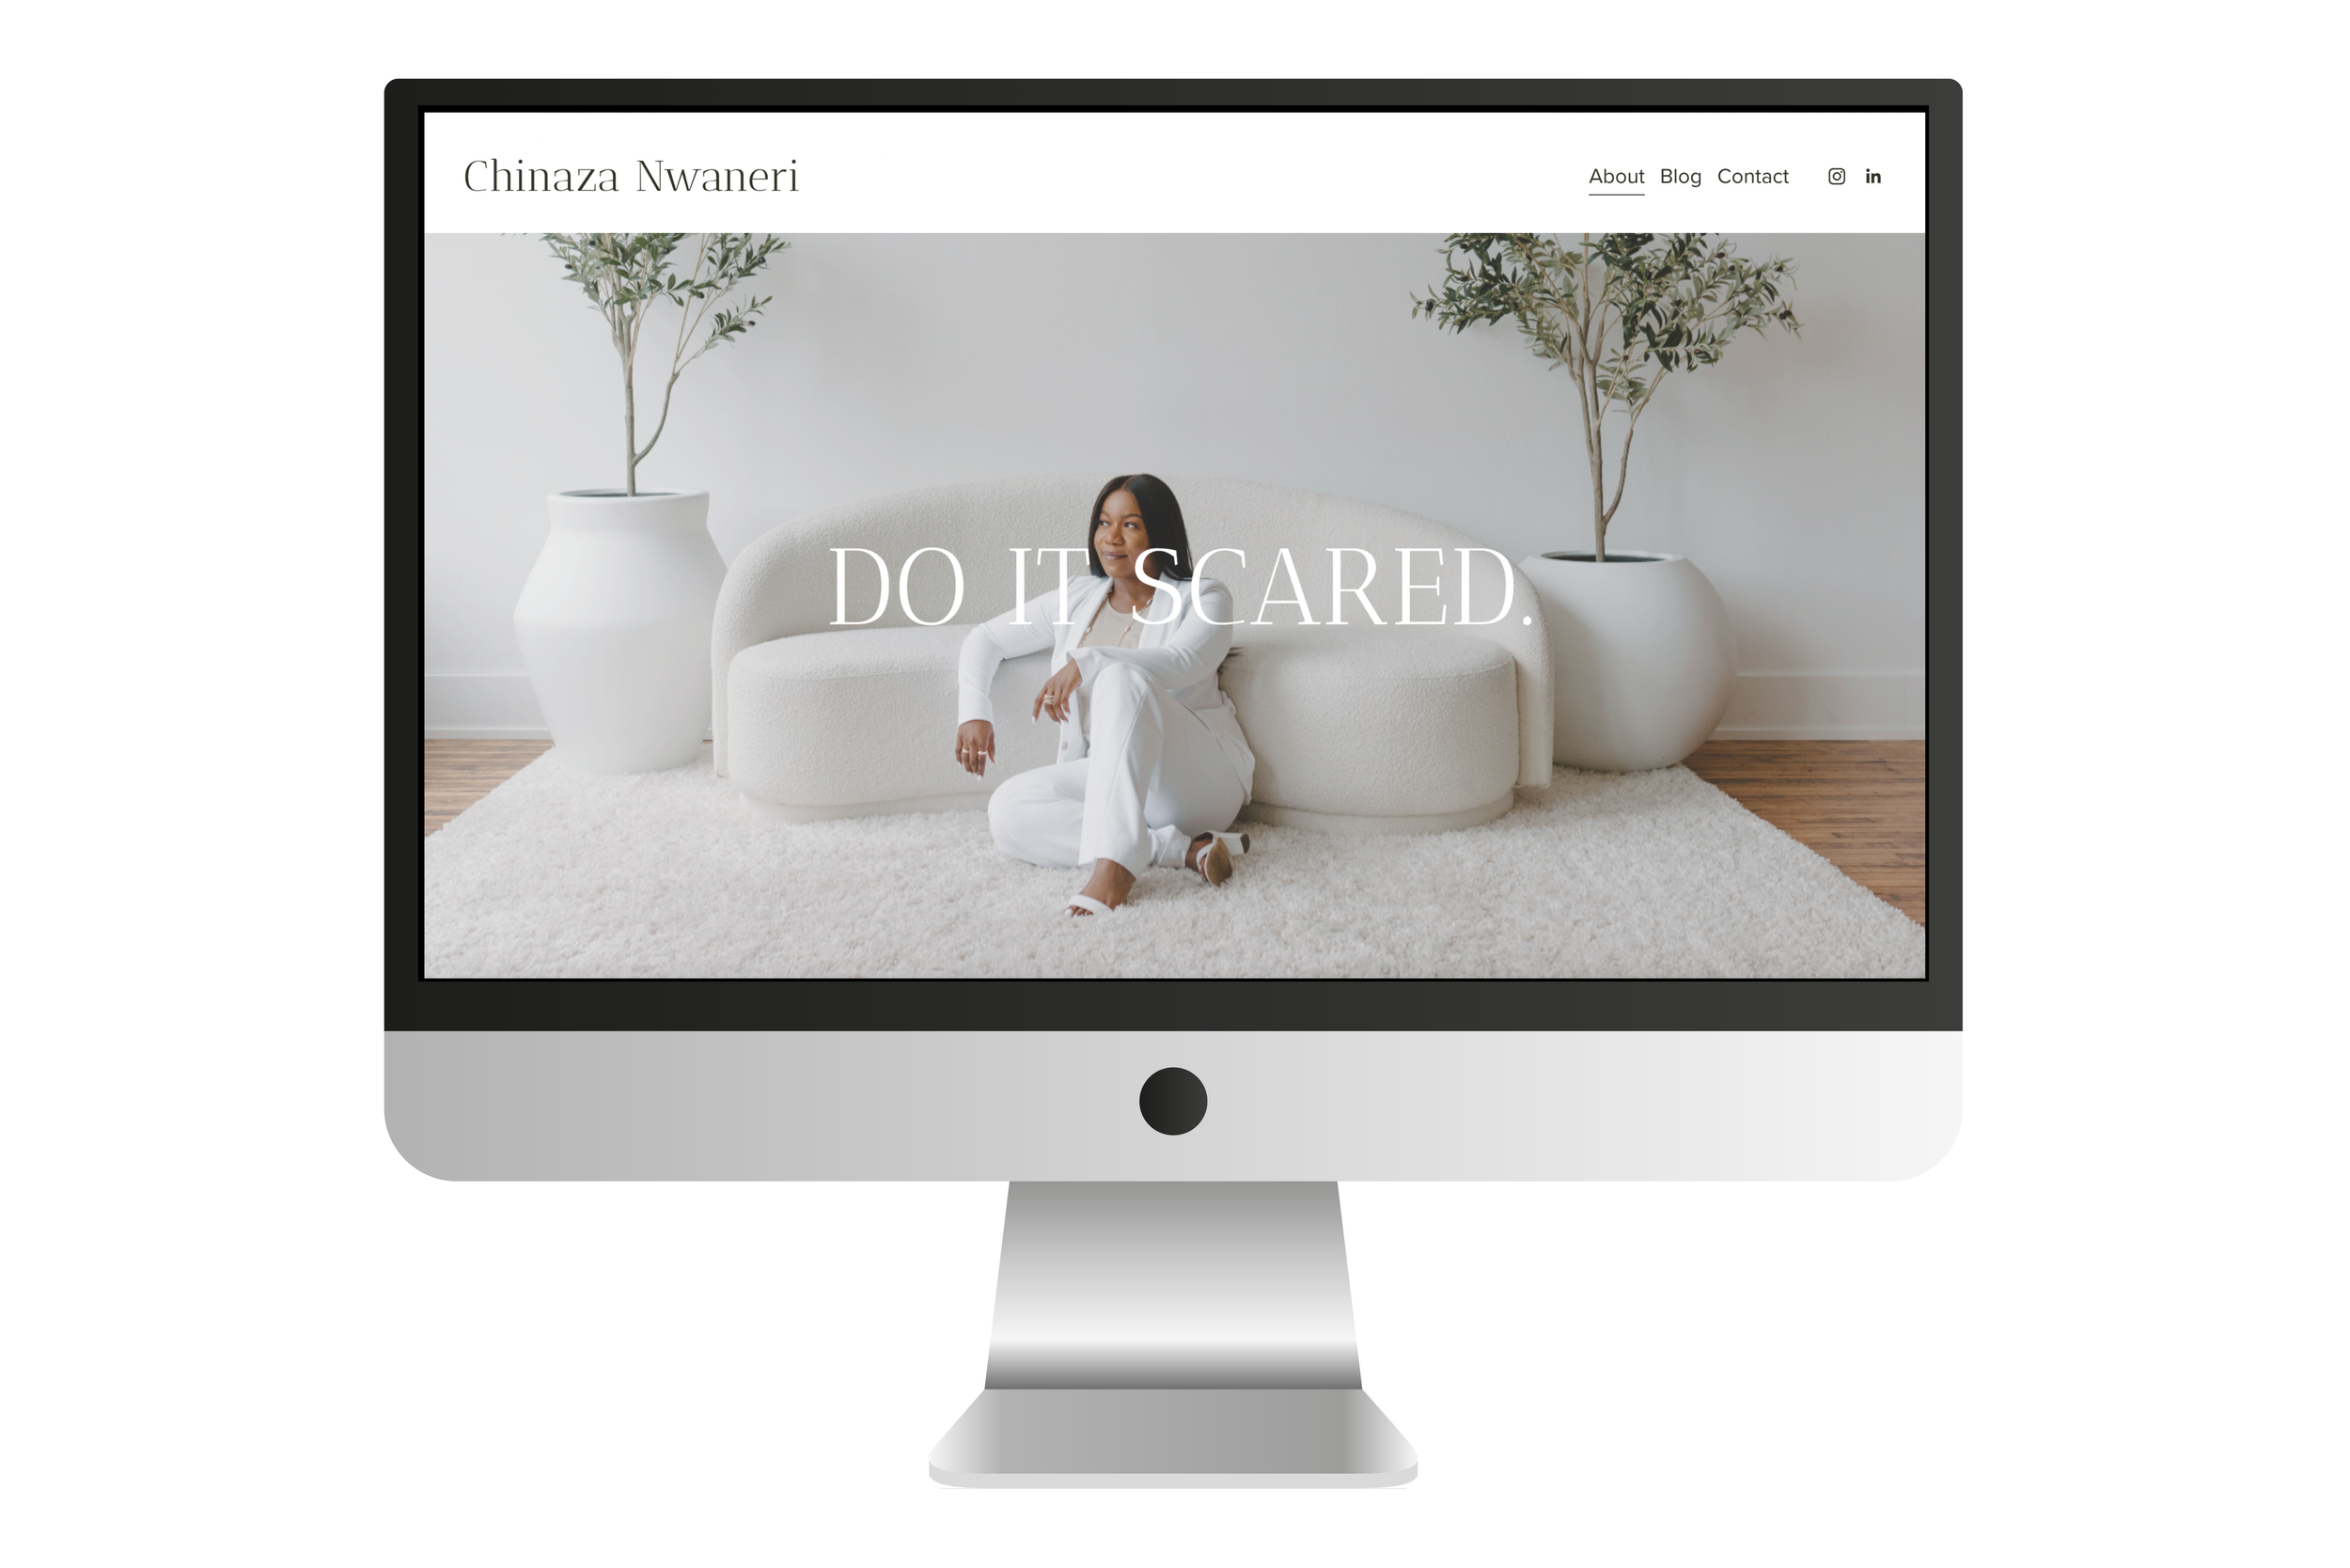
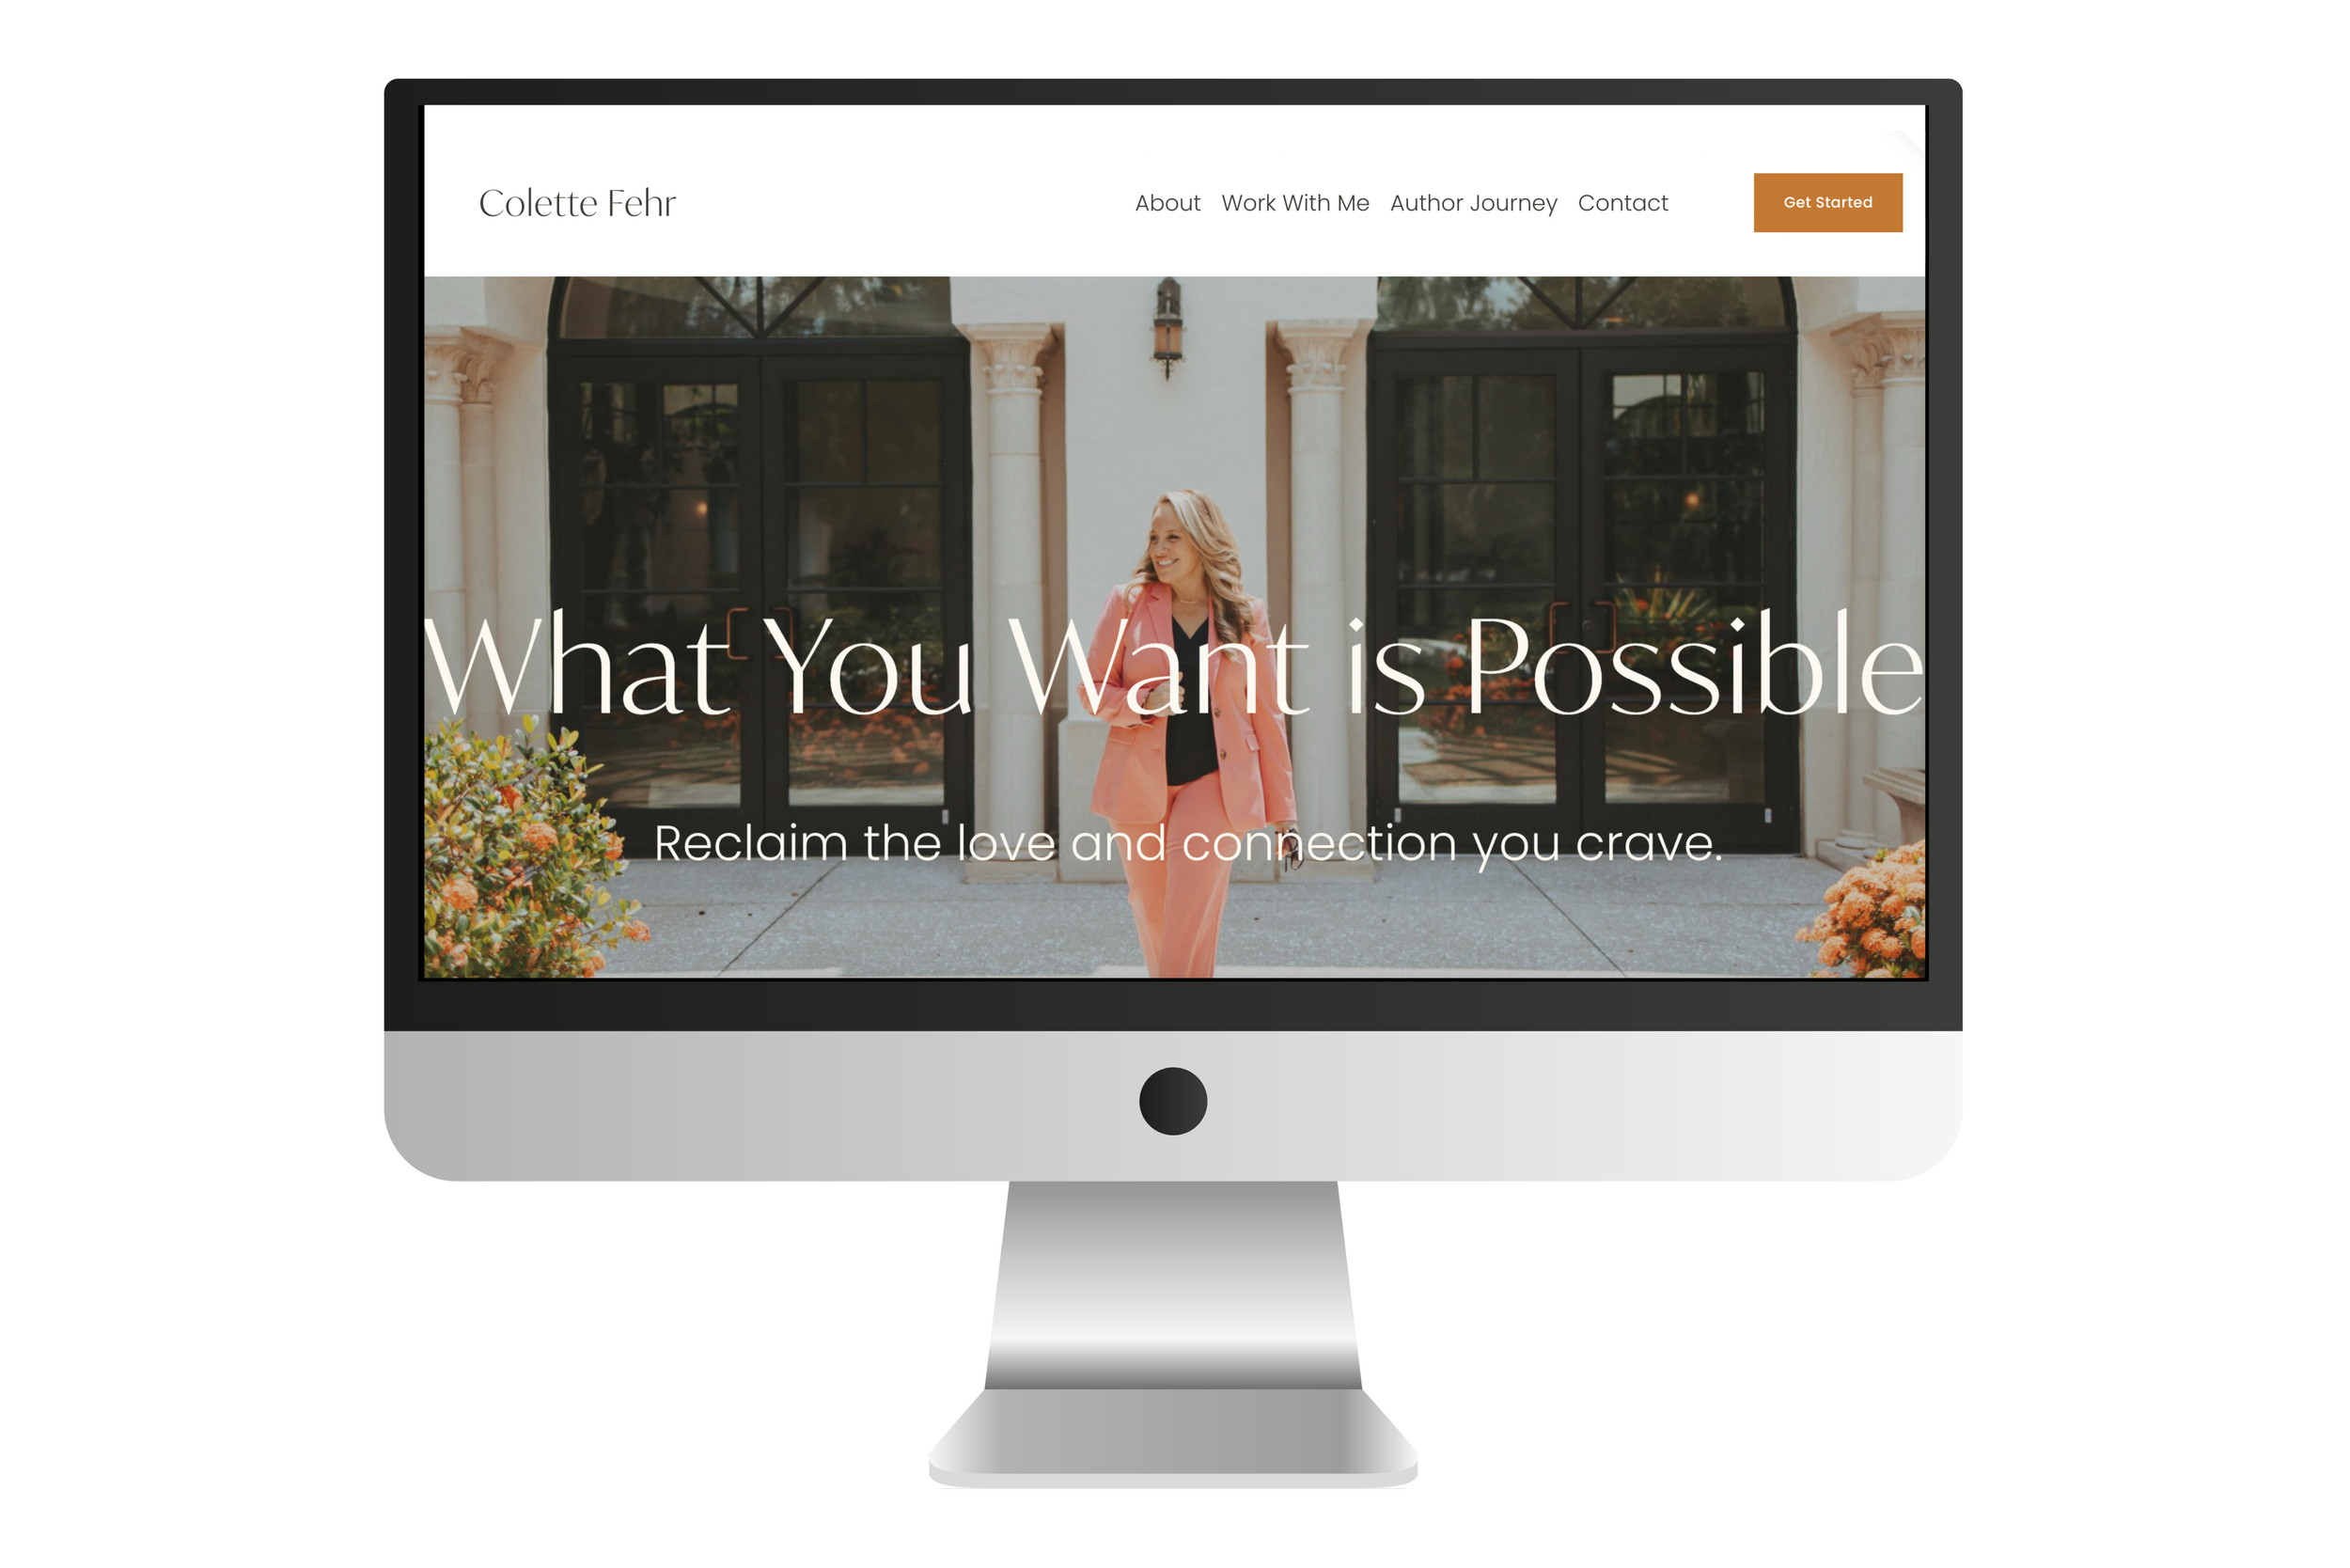
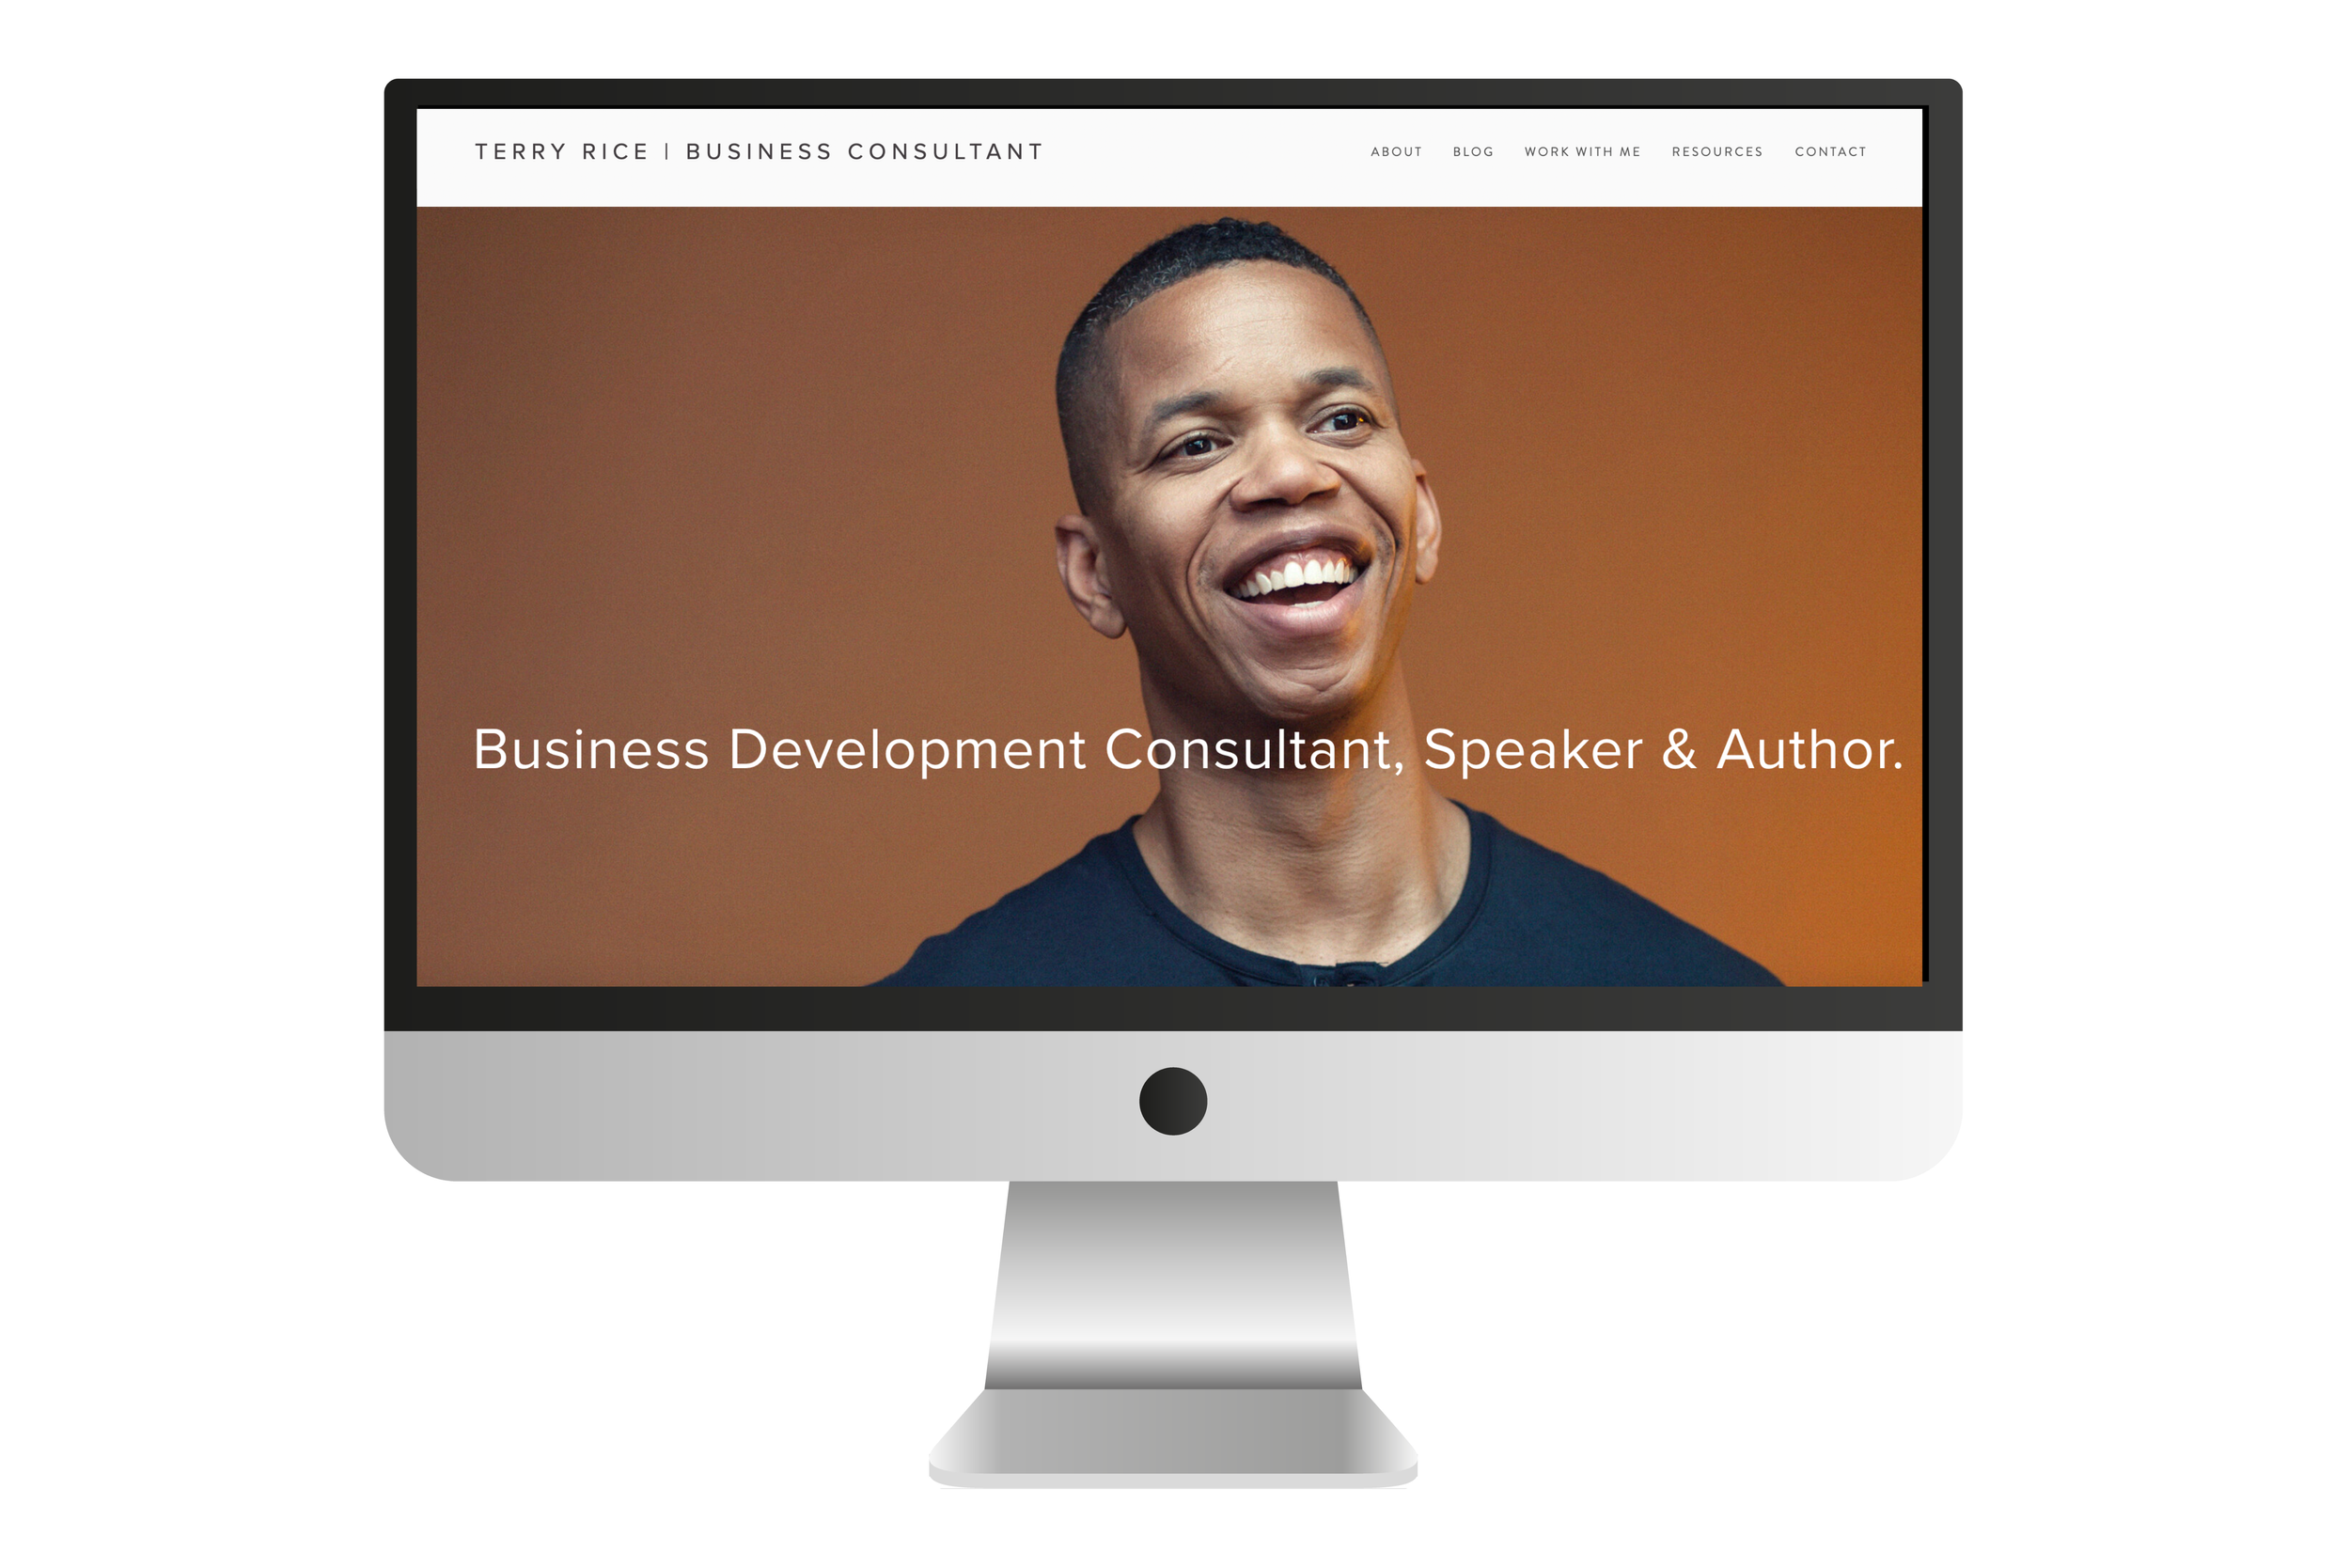
Personal Website Example Wireframes
Input your content
Your "content" includes any photos you want to include on your website, as well as the website copy you wrote in the previous step. If your copy is not finished, you can use placeholder text. If you don't have photos of your own, you can use stock photos.
Register your domain
Most website hosting platforms offer a free domain. Use your first and last name as your website domain (e.g., annavatuone.com). If your domain is already taken or too expensive, consider using your middle name or variations of your name. You can also try using a hyphen or a different domain extension like .co. Take your time to find a domain name that suits you.
Optimize your website for search engines
Keep your website simple and align it with your brand words. Having more content increases the likelihood of search engines indexing your website. Use H1 tags to indicate the topic of each section. Research what your audience is searching for using Google.
Test your website with family and friends
Before launching your website, test it with family and friends. Ask them to explore every page, read all the content, and interact with all the buttons. Only launch your website when it is ready, not because you feel rushed.
As you build your website, don't give up! Yes, this exercise will take time, but try to enjoy the process and have fun with it. Build your personal website with the end in mind. Remember why you are building your personal brand and identify your three main objectives for your website.
If you encounter roadblocks…
Roadblocks are an inevitable part of this process. This is where bering a part of a community like PBA is so helpful! Remember to pause, take a break, and come back to your website later with a fresh perspective if you encounter difficulties. Whatever you do, don't give up!
Step 7: Optimize Your Social Media Profiles

Audit Your Accounts
Ask yourself: “What is in alignment with my personal brand and what is not?” Then, edit accordingly by removing content you no longer wish to show people. As you’re going through this process, remember that people love to see a journey unfold. So don’t remove content that shows people how you arrived to where you are today.
Determine Your Social Media Strategy
Consider which social media profiles you want to use, taking into account your bandwidth and capacity to manage them. It's important not to try to do too many things at once. Your best bet is to focus on the platforms you feel the most comfortable with, but don't be afraid to push yourself to try something new. For example, I am presently focusing on Instagram, TikTok and Substack. (If you’re not on TikTok yet, this is your sign to start!)
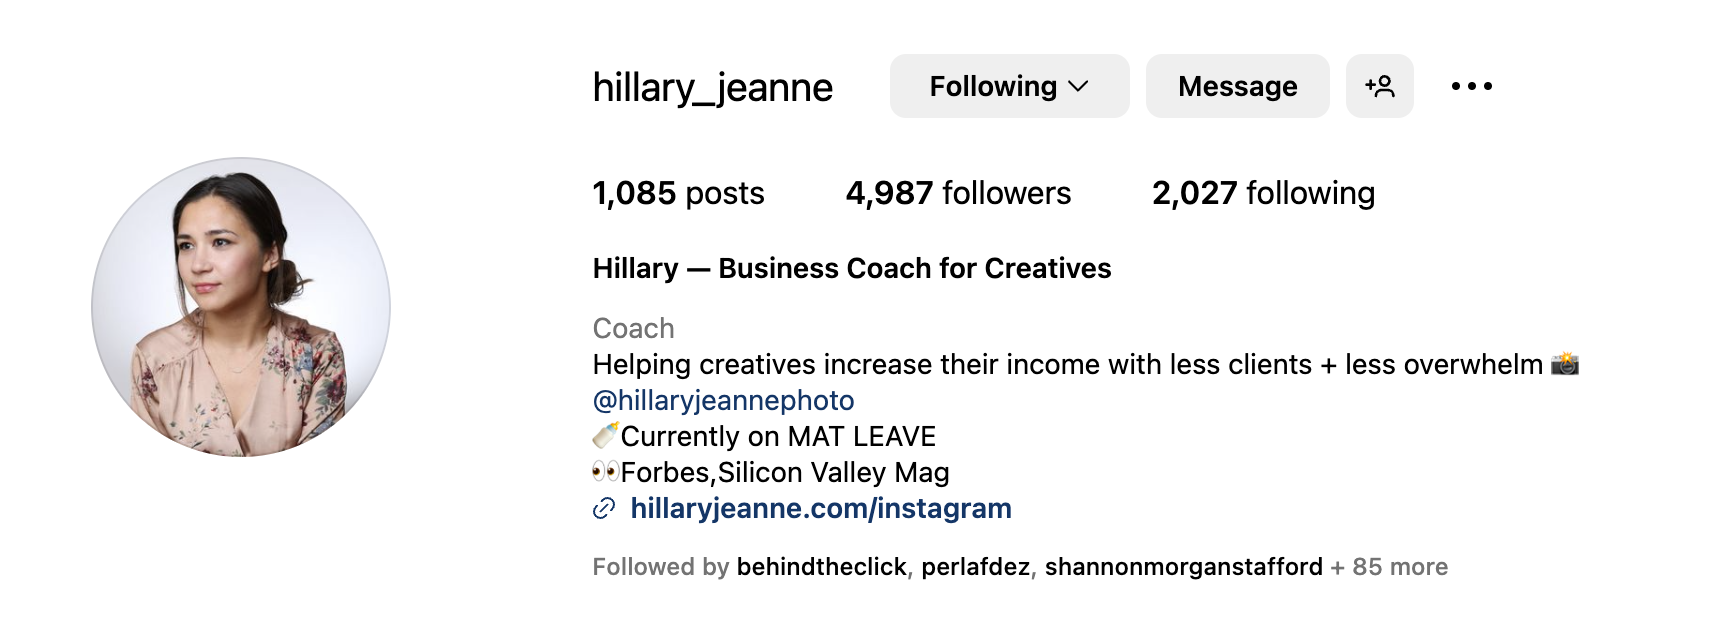
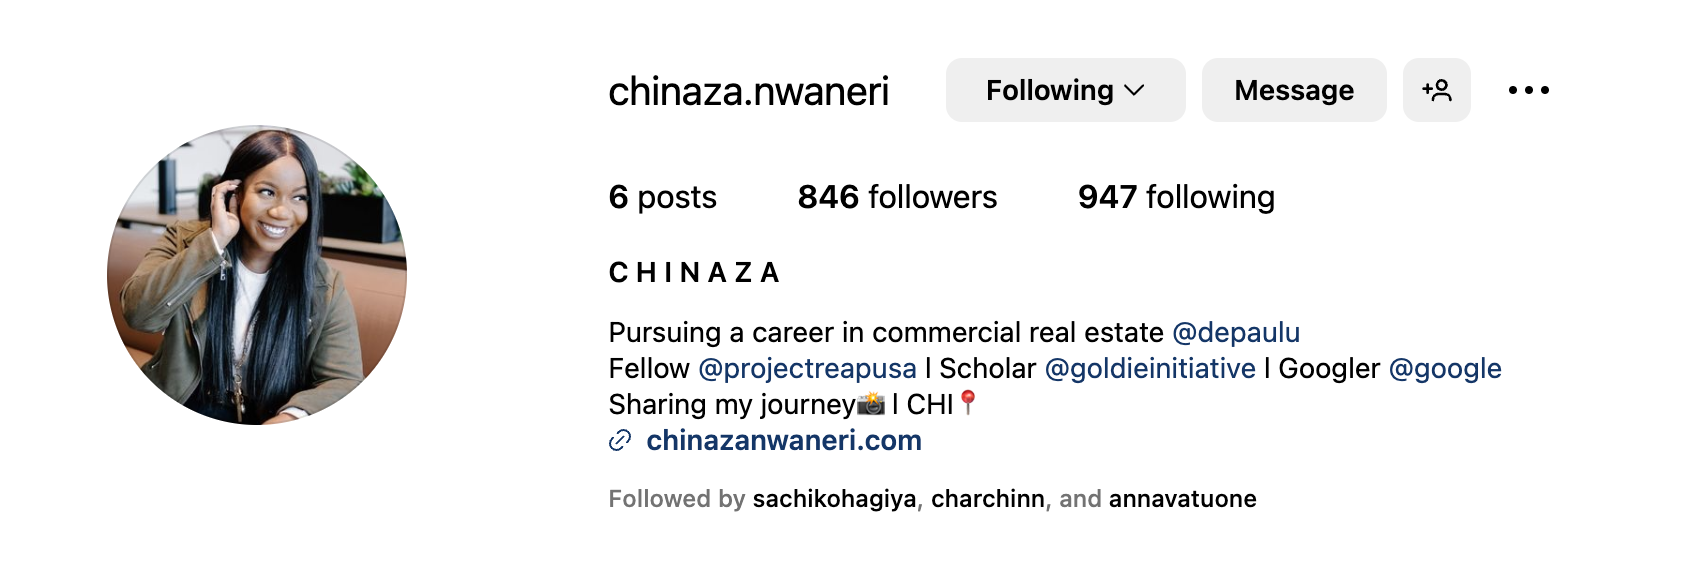
CHOOSE A PROFILE PICTURE
Think of your profile picture as your logo; it should rarely change. It needs to be a high-resolution image that is upclose, allowing your features to be clearly visible. This picture should enable people to easily recognize you and get a sense of your personality and character. Start by selecting three adjectives that you want this photo to convey. For instance, you might choose "influential, competent, and approachable." Then, find or create an image that embodies these qualities.
SELECT YOUR USER NAME
Always use your first and last name for all usernames across social media. Avoid using trendy names to describe yourself. Your real name is prime digital real estate and never goes out of style. Avoid using periods and underscores as they dilute the impact of your full name. If your first or last name is not available, consider adding your middle name. Remember: Don't hide behind a disguise. This is your opportunity to be proud of your work and your name!
UPDATE YOUR BIOS
First line should be a clear personal brand statement to explain what you do and who you do it for. Remember, clear > clever.
Example: ”I teach people how to build their personal brand.” (*Short, sweet and to the point.)
For bios that give you more characters to work with, list your credentials and a call to action.
For example, have you been featured in any publications? Are you the founder of an organization? Do you host a podcast? Tell people what you’re up to, and show them where they can follow along. Try to refrain from using too many emojis as this can clutter the space. If you’re going to use them, make sure they’re appropriate and reflective of your brand.
Underneath your credentials you can always leave a call to action (taking into consideration what your goals for your personal brand are in 2021). Do you want people to apply to work with you? Send you a DM? Subscribe to your newsletter? Follow you? This is your chance to tell them. Your CTA should guide them in your desired direction and serve as the first step in the nurturing stage.
START POSTING
For each platform, think about how you can tailor your content to engage your audience. Consider that different types of posts that perform differently each platform and adapt your content strategy accordingly. No matter what you post, stay consistent with your Personal Brand Story and core message across all platforms. If you need help clarifying your message or writing your Personal Brand Story, joining a program like Personal Brand Accelerator can help. Stay tuned for when the next round of PBA is open for enrollment so you can be the first to know and submit your application!
Step 8: Create Authentic Content

At its core, content creation is about sharing who you are, what you know, and embracing your creative instincts to bring something new into the world.
When we view content creation as an art form, rather than a means to market ourselves, we feel less shame, pressure, and anxiety. This allows us to be authentic and create something meaningful.
Embrace Your Inner Artist
Even if you don't consider yourself as "creative" or an artist, we all possess artistic and creative tendencies. The skill of bringing something new and meaningful into existence is inherent in all of us. As we define an artist, take note of the quality that resonates with you the most. Which one do you identify with?
Artist stands for:
A - The audacity to try.
R - The readiness to work.
T - The tools to support you.
I - The willingness to iterate.
S - The ability to surrender.
T - The tenacity to follow through.
The Artist’s Tools
Tripods
Small Tripod
Large Tripod
Adaptor
Apps
VSCO
InShot
Preview
Other Accessories
The Artist’s Journey
Once the artist is armed with her tools, then she is free to begin her journey. There are 4 Steps in the Artist’s journey. Conception - The forming of an idea. Creation - Bringing form to your idea. Communication - Sharing your idea out loud. Commitment - Sticking with your idea (even if it changes).
Conception: How does an idea form?
Lived experience
Client/customer interactions
Intentional research
In response to something that inspires you
At random
Creation: How does one bring form to their idea?
Video
Photo
Written Word
Audio
Communication: How does one share their idea?
Social Media
In community
Email List
Blog, etc.
Commitment: How can you stick with your creative idea?
Daily creative habits
Lifestyle change
Maintain healthy boundaries
Honor values
Start Today
Without action, there’s no creation. If you want to create something, you've got to take action. Consider this your cue to start sharing your content today! Create something that you find easy and natural to make, using platforms that feel comfortable for you. Bring your creative ideas to life through photos, videos, audio, or written words. And, hey, if you need help, joining a program like Personal Brand Accelerator will give you the tools you need to create beautiful content and post with confidence online.
Conclusion

This is just the beginning of your personal branding journey. Remember that it won’t always be easy to share your story with others, it won’t always be easy to create content or live your truth out loud. Everyday you will face fear. What’s waiting for you on the other side is ultimately much greater than your fear.
Your goal is always to share what is true for you. Share the truth of your experiences with honesty, grace, and humility. Let others learn from where you’ve been and don’t hold back. Create content every day, and if you fall behind, get up and try again. You cannot fail if you tell the truth. Share your story, the world needs to hear it.